Tying your own trout flies is one of the most rewarding aspects of fly fishing. It adds a deeply personal touch to every cast, and there’s nothing quite like landing a fish on a fly you crafted yourself. Whether you’re aiming to match the hatch more precisely, save money over time, or simply enjoy a relaxing, hands-on hobby, learning to tie your own flies opens up a whole new level of engagement with the sport.
In this post, we’ll guide you through the basics of tying trout flies, essential tools and materials, a few beginner-friendly patterns to start with, and tips to improve your tying skills over time.
Why Tie Your Own Flies?
- Customization: Match local hatches with precision.
- Cost-Effective: Over time, tying flies becomes cheaper than buying them.
- Creative Outlet: Combine form, function, and artistry.
- Performance Boost: Tailor fly size, color, and profile to specific conditions and preferences.
Essential Tools for Fly Tying
Before you start, you’ll need some basic tools:
- Vise: Holds the hook firmly in place while you tie.
- Bobbin: Holds and dispenses thread smoothly.
- Scissors: Fine-tipped for precision cutting.
- Hackle Pliers: Grips feathers or hackle tightly.
- Whip Finisher: Helps tie strong, neat knots at the end of your fly.
- Bodkin: A needle-like tool for applying head cement or teasing out dubbing.
A quality beginner fly tying kit will usually include all of these items.
Common Materials Used in Trout Flies
- Hooks: Sizes 10–18 are standard for trout flies.
- Thread: 6/0 or 8/0 is a good all-around choice for beginners.
- Dubbing: Natural or synthetic fibers for building up fly bodies.
- Feathers (Hackle): For dry fly wings and collars.
- Chenille and Yarn: For woolly bodies or nymphs.
- Beads and Wire: Used to add weight and realism.
You’ll also use natural furs, synthetic flash, and sometimes foam, depending on the fly pattern.
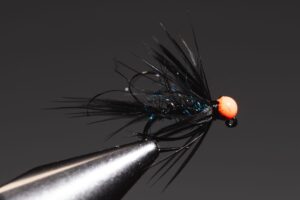
3 Beginner-Friendly Trout Fly Patterns
Start with simple, time-tested patterns that will catch fish and teach you the fundamentals.
1. Woolly Bugger
- Type: Streamer
- What It Imitates: Leeches, baitfish, and large aquatic insects.
- Materials: Hook size 8–12, marabou tail, chenille body, hackle feather, lead wire (optional).
- Why It’s Great: Versatile and easy to tie, great for learning how to wrap materials and add weight.
2. Hare’s Ear Nymph
- Type: Nymph
- What It Imitates: Mayfly and caddisfly nymphs.
- Materials: Hook size 12–16, hare’s ear dubbing, gold wire ribbing, turkey tail for wing case.
- Why It’s Great: Teaches dubbing techniques and how to build natural-looking bodies.
3. Elk Hair Caddis
- Type: Dry fly
- What It Imitates: Adult caddisflies.
- Materials: Hook size 14–18, elk hair wing, dry fly hackle, dubbing or thread body.
- Why It’s Great: Excellent dry fly for fast water, and introduces wing and hackle techniques.
Basic Steps to Tie a Trout Fly
- Secure the Hook in the Vise: Make sure it’s tight and level.
- Start the Thread: Wrap it around the hook shank to build a foundation.
- Add Tail (if applicable): Tie in a few fibers for a natural look.
- Build the Body: Wrap dubbing, chenille, or feather along the hook.
- Add Wings or Hackle: Tie in these materials carefully, depending on the pattern.
- Whip Finish: Use your whip finisher or hand technique to tie a strong finishing knot.
- Apply Head Cement: This seals the thread and increases durability.
Tips for Success
- Less is More: Don’t overload your fly with materials—trout prefer a natural, sparse look.
- Practice Makes Perfect: Your first flies won’t be pretty, but each one teaches you something.
- Use Sharp Scissors: Clean cuts make cleaner flies.
- Study Real Insects: Understand how mayflies, caddisflies, and stoneflies look and move.
- Watch Tutorials: YouTube is a goldmine of instructional videos from expert tiers.
Organizing Your Fly Tying Space
A clean, organized tying bench makes the process more enjoyable. Use bins or trays for materials, keep tools within reach, and invest in good lighting. As your fly tying skills progress, you’ll appreciate the efficiency of a well-arranged workspace.
Looking for a fly-tying kit that will have everything you need to jump in and start tying your own flies? Here at 247trout we suggest this kit: https://amzn.to/3GEmXqr
Conclusion
Tying your own trout flies is more than just a cost-saving measure—it’s a gateway to deeper understanding, greater satisfaction, and better results on the water. With just a few basic tools and materials, you can begin crafting effective, personalized flies that reflect your fishing style and local conditions. So grab a vise, pick a pattern, and start wrapping—you’ll be amazed at what your hands can create.